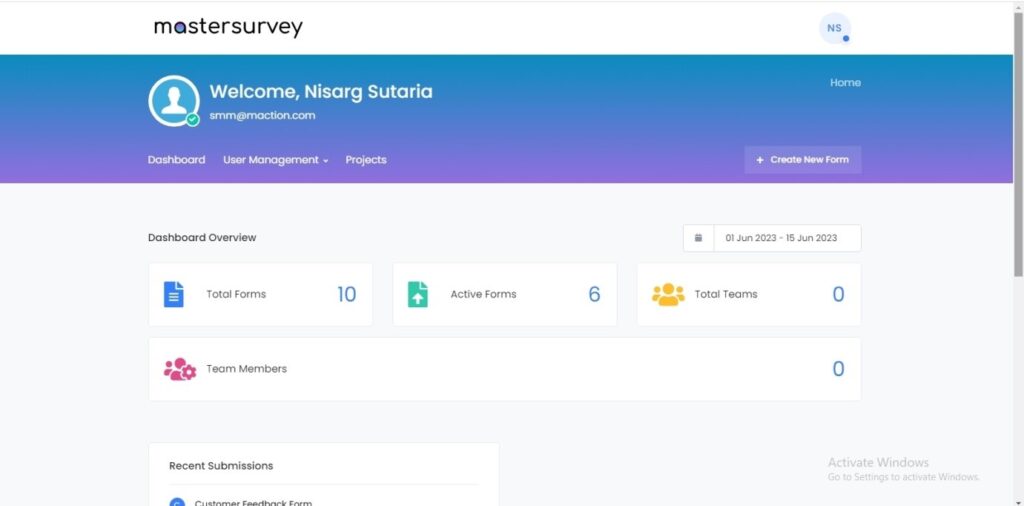
After Login to Mastersurvey you will reach this the screen mentioned above. It is a dashboard.
You will click on Select Create New Form Option and you will receive New Form as below.
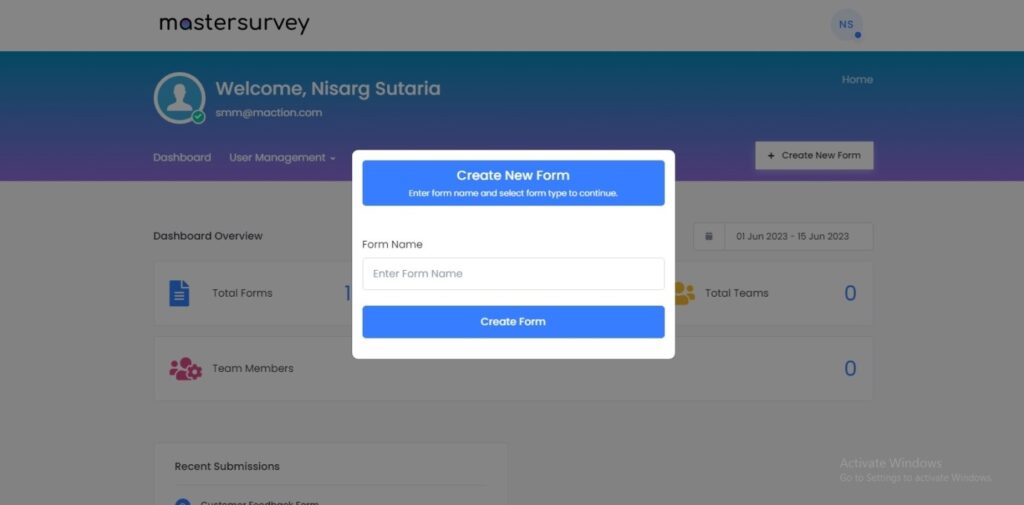
Please type the form /project name. For Testing we have written Mastersurvey Help.
Below mention screen will appear.
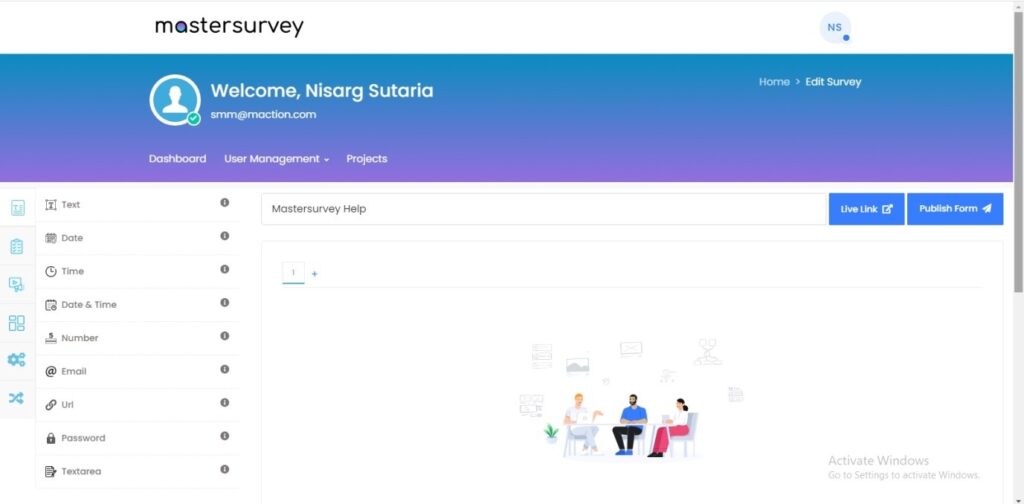
Now we will check all the options mentioned on the left side which are Inputs, Choices, Media, Heading & Write-up, Options & Conditional Logic.
Let us Begin with Inputs:

We will check Text, Date, Time, Date & Time, Number, Email, URL, Password & Textarea Inputs.
Option : Textbox
Configuration of Text of Inputs Section.
With the help of open-ended questions, get to know your respondent’s deep thoughts precisely.
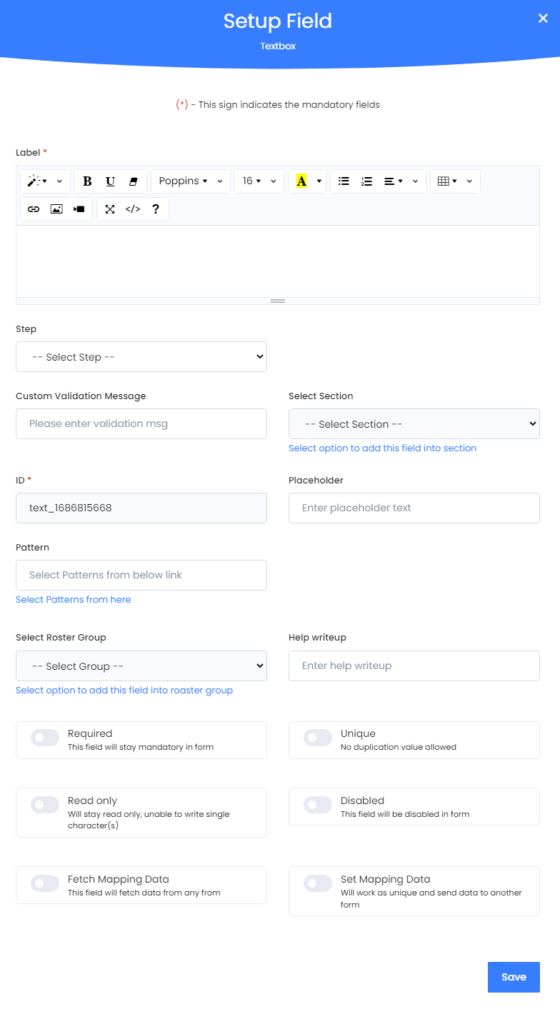
Label : Here you write the Text which you want to display.
Step is number of the Form on Project Dashboard. Refer to this Image below. Check the + Sign.
Mastersurvey Main Screen :

Custom Validation Message:
You have the option to mention please write Characters, Numbers or both.
Select Section: Not required for this Form-Inputs Option. Attaches the question to a particular section of the survey, thus keeping your survey more organised and tidy.
ID: This characters & numbers field is generated automatically.
Placeholder: A custom message for respondents can be placed inside the input field.
Select Roster Group: Attaches the roster group to a particular section of the survey, thus keeping your survey more organised and tidy..
Help writeup: Gives the user a hint to the answer of the question.
Required: This Text Form should have a record.
Unique: This Text Form should not have repetitive data.
Read only: Non Editable
Disabled: This option should not work.
Fetch Mapping Data: This setup field will fetch data from any from.
Set Mapping Data : Will work as unique and send data to another form.
To SAVE the settings please press Submit Button of Blue Color on bottom right side.
Option : Date
Select date from a pop up calendar. Can be clubbed with custom restriction to only let a certain be a valid response. The response collects the date, day and month and year.
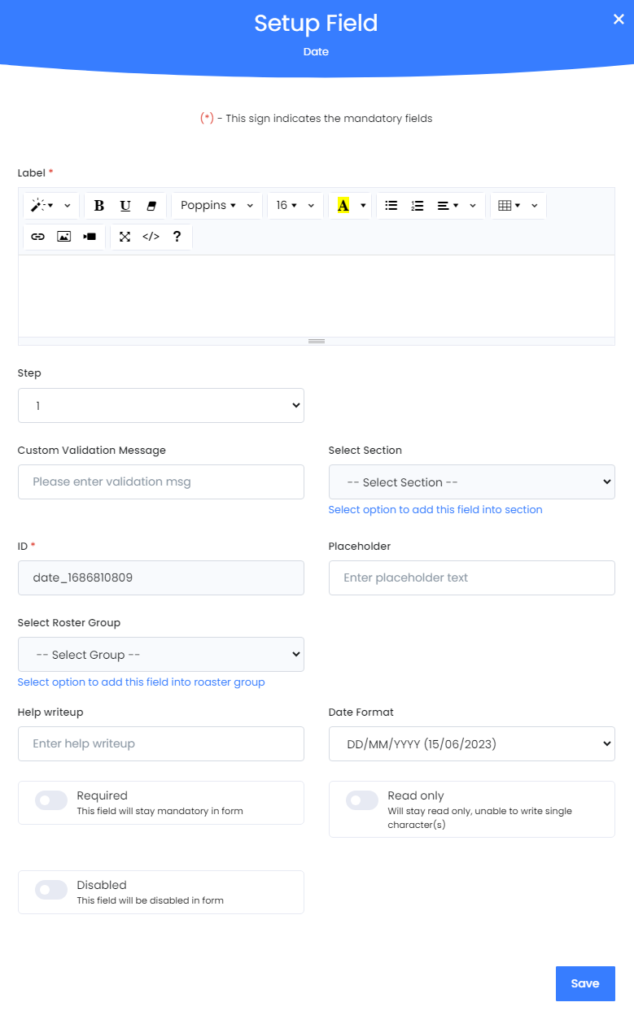
Label : Here you write the Text which you want to display.
Step is number of the Form on Project Dashboard. Refer to this Image below. Check the + Sign.
Mastersurvey Main Screen :

Custom Validation Message:
You have the option to mention please write Characters, Numbers or both.
Select Section: Not required for this Form-Inputs Option. Attaches the question to a particular section of the survey, thus keeping your survey more organised and tidy.
ID: This characters & numbers field is generated automatically.
Placeholder: A custom message for respondents can be placed inside the input field.
Select Roster Group: Attaches the roster group to a particular section of the survey, thus keeping your survey more organised and tidy..
Help writeup: Gives the user a hint to the answer of the question.
Date Format :
There are 3 ways you can display date.
DD/MM/YYYY
MM/DD/YYYY
DD MM YYYY
Please pick one option from the Combo Box.
Required: This Date Form should have a record.
Read Only:
Disabled: This option should not work.
To SAVE the settings please press Submit Button of Blue Color on bottom right side.
Configuration of Time Area of Inputs Section.
Time can be gathered in 12H or 24H format.
Option : Time
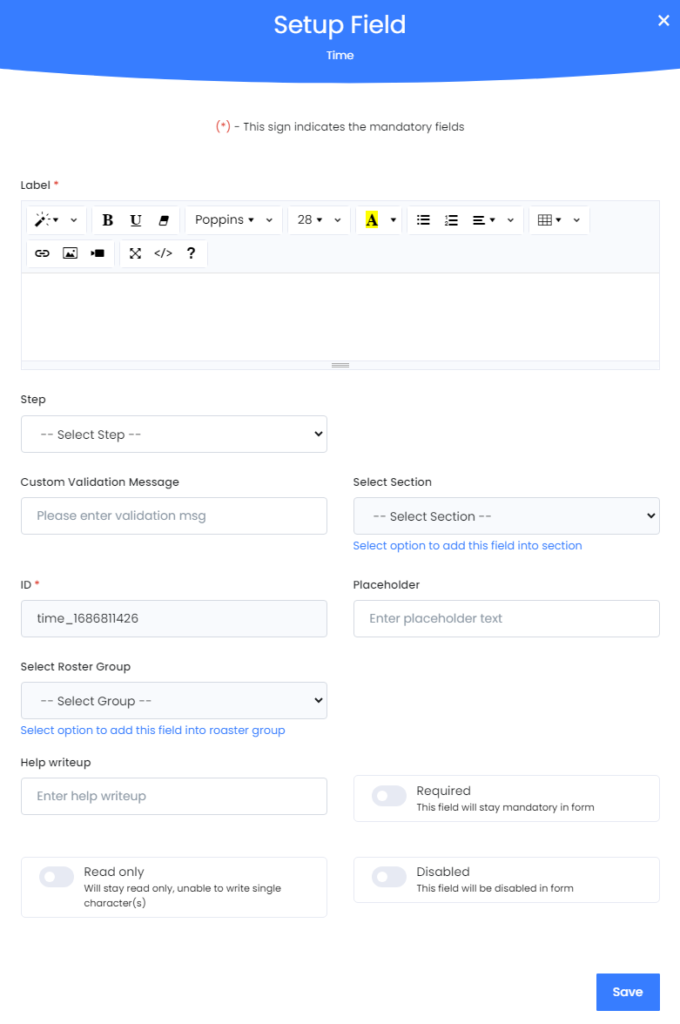
Label : Here you write the Text which you want to display.
Step is number of the Form on Project Dashboard. Refer to this Image below. Check the + Sign.
Mastersurvey Main Screen :

Custom Validation Message:
You have the option to mention please write Characters, Numbers or both.
Select Section: Not required for this Form-Inputs Option. Attaches the question to a particular section of the survey, thus keeping your survey more organised and tidy.
ID: This characters & numbers field is generated automatically.
Placeholder: A custom message for respondents can be placed inside the input field.
Select Roster Group: Attaches the roster group to a particular section of the survey, thus keeping your survey more organised and tidy..
Help writeup: Gives the user a hint to the answer of the question.
Required: This Time Form should have a record.
Read Only: Non Editable
Disabled: This option should not work.
To SAVE the settings please press Submit Button of Blue Color on bottom right side.
Configuration of Date & Time Area of Inputs Section.
Collects both Date and Time, with date first and then the time. The format for date is dd-mm-yyyy and the format for time is 24H.
Option : Date & Time
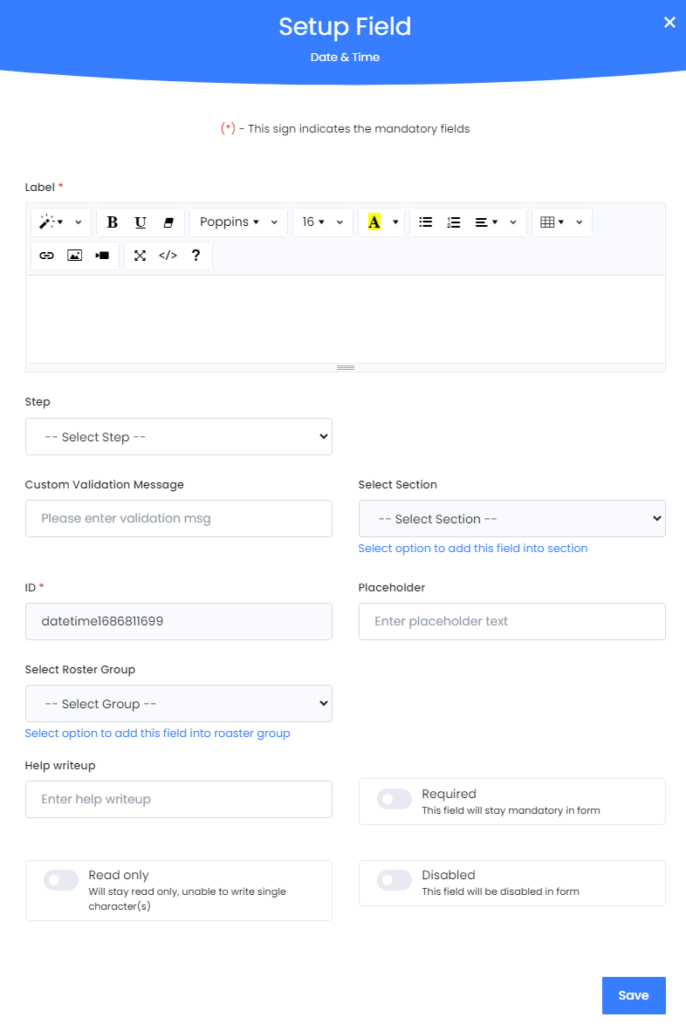
Label : Here you write the Text which you want to display.
Step is number of the Form on Project Dashboard. Refer to this Image below. Check the + Sign.
Mastersurvey Main Screen :

Custom Validation Message:
You have the option to mention please write Characters, Numbers or both.
Select Section: Not required for this Form-Inputs Option. Attaches the question to a particular section of the survey, thus keeping your survey more organised and tidy.
ID: This characters & numbers field is generated automatically.
Placeholder: A custom message for respondents can be placed inside the input field.
Select Roster Group: Attaches the roster group to a particular section of the survey, thus keeping your survey more organised and tidy..
Help writeup: Gives the user a hint to the answer of the question.
Required: This Date & Time Form should have a record.
Read Only: Non Editable
Disabled: This option should not work.
To SAVE the settings please press Submit Button of Blue Color on bottom right side.
Configuration of Numbers Area of Inputs Section.
Only numerical values with a feature to set custom filters on the value. Eg: Greater than, less than or equal to, only integer etc.
Option : Number
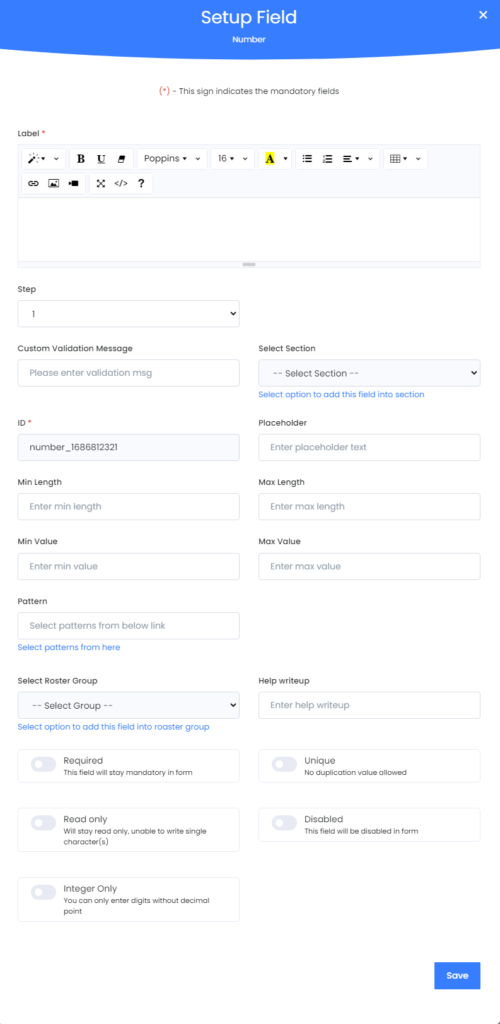
Label : Here you write the Text which you want to display.
Step is number of the Form on Project Dashboard. Refer to this Image below. Check the + Sign.
Mastersurvey Main Screen :

Custom Validation Message:
You have the option to mention please write Characters, Numbers or both.
Select Section: Not required for this Form-Inputs Option. Attaches the question to a particular section of the survey, thus keeping your survey more organised and tidy.
ID: This characters & numbers field is generated automatically.
Placeholder: A custom message for respondents can be placed inside the input field.
Min Length : Enter Minimum Length of Numbers Input
Max Length : Enter Maximum Length of Numbers Input
Min Value : Enter Minimum Value of the Number
Max Value : Enter Maximum Value of the Number
Pattern :
Select Roster Group: Attaches the roster group to a particular section of the survey, thus keeping your survey more organised and tidy..
Help writeup: Gives the user a hint to the answer of the question.
Required: This Number Field should have a record.
Unique: This Text Form should not have repetitive data.
Read only: Non Editable
Disabled: This option should not work.
Integer Only: Consider Input Only Numbers as Numbers and Do Not Define Input Numbers As Text
To SAVE the settings please press Submit Button of Blue Color on bottom right side.
Option : Email
Configuration of Email Area of Inputs Section.
Collects email from the respondents.
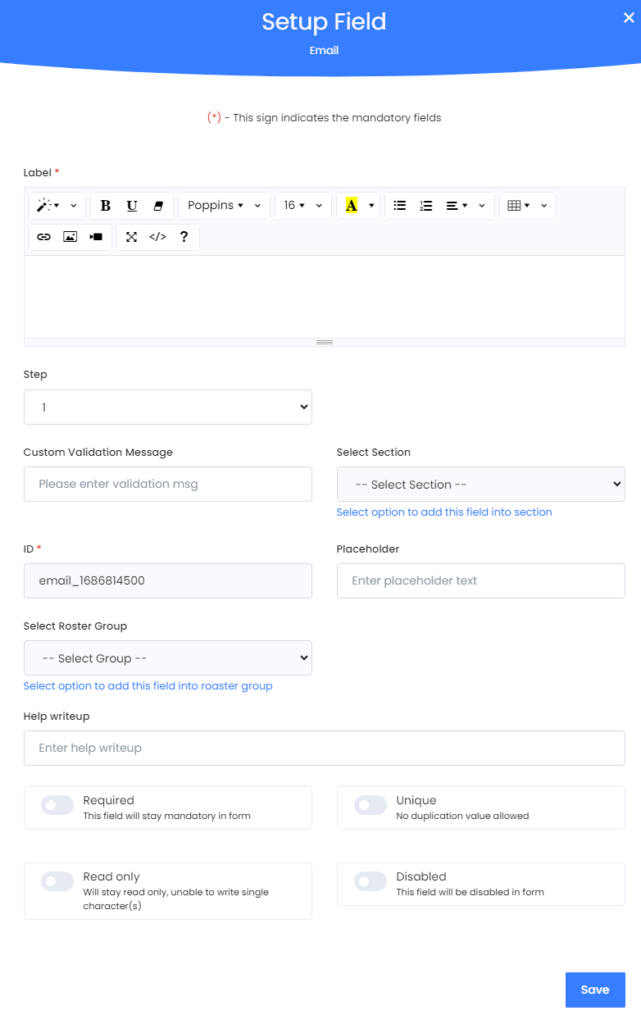
Label : Here you write the Text which you want to display.
Step is number of the Form on Project Dashboard. Refer to this Image below. Check the + Sign.
Mastersurvey Main Screen :

Custom Validation Message:
You have the option to mention please write Characters, Numbers or both.
Select Section: Not required for this Form-Inputs Option. Attaches the question to a particular section of the survey, thus keeping your survey more organised and tidy.
ID: This characters & numbers field is generated automatically.
Placeholder: A custom message for respondents can be placed inside the input field.
Select Roster Group: Attaches the roster group to a particular section of the survey, thus keeping your survey more organised and tidy..
Help writeup: Gives the user a hint to the answer of the question.
Required: This Email Field should have a record.
Unique: This Text Form should not have repetitive data.
Read only: Non Editable
Disabled: This option should not work.
To SAVE the settings please press Submit Button of Blue Color on bottom right side.
Configuration of URL Area of Inputs Section.
Insert URL for anything on web and it checks the URL. Be it your resume, your photo drive, a video you found funny or a large document.
Option : URL
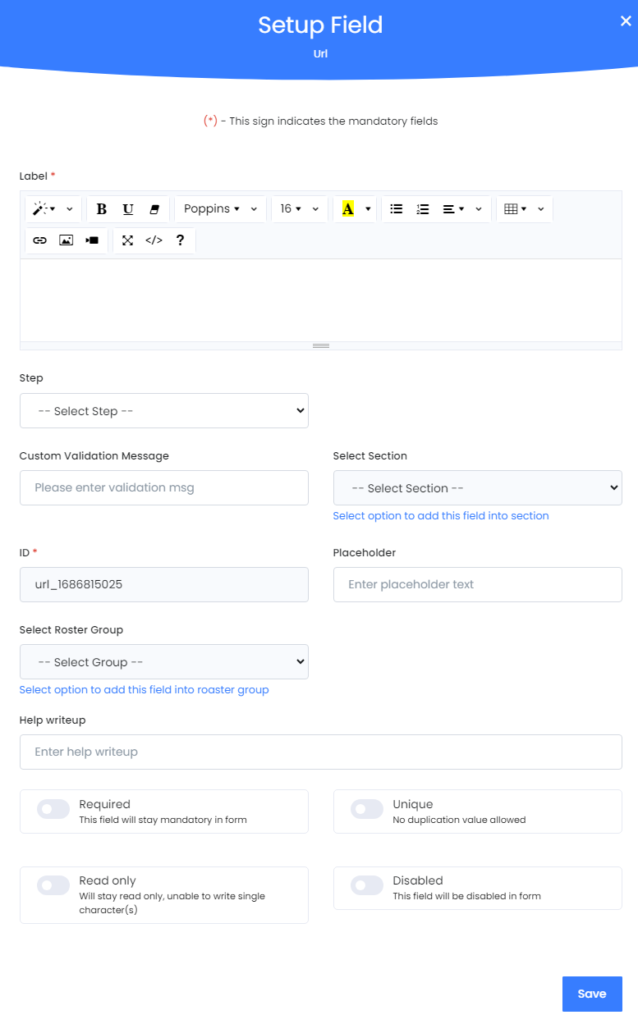
Label : Here you write the Text which you want to display.
Step is number of the Form on Project Dashboard. Refer to this Image below. Check the + Sign.
Mastersurvey Main Screen :

Custom Validation Message:
You have the option to mention please write Characters, Numbers or both.
Select Section: Not required for this Form-Inputs Option. Attaches the question to a particular section of the survey, thus keeping your survey more organised and tidy.
ID: This characters & numbers field is generated automatically.
Placeholder: A custom message for respondents can be placed inside the input field.
Select Roster Group: Attaches the roster group to a particular section of the survey, thus keeping your survey more organised and tidy..
Help writeup: Gives the user a hint to the answer of the question.
Required: This Text Form should have a record.
Unique: This URL Field should not have repetitive data.
Read only: Non Editable
Disabled: This option should not work.
To SAVE the settings please press Submit Button of Blue Color on bottom right side.
Configuration of Password Area of Inputs Section.
Password is collected, with standard hidden characters that can be made visible with ‘view’ button.
Option : Password
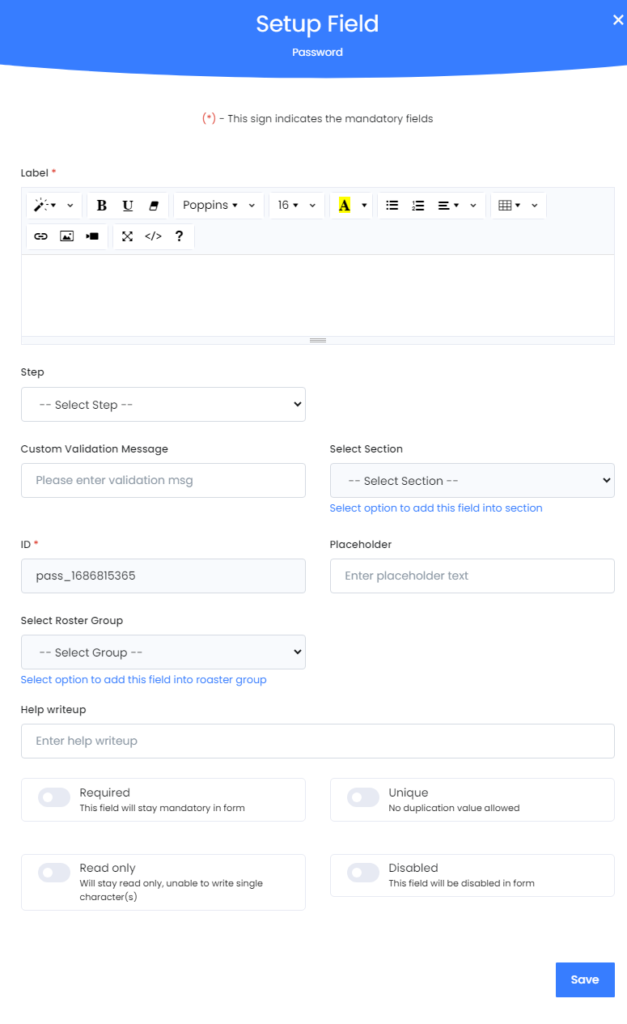
Label : Here you write the Text which you want to display.
Step is number of the Form on Project Dashboard. Refer to this Image below. Check the + Sign.
Mastersurvey Main Screen :

Custom Validation Message:
You have the option to mention please write Characters, Numbers or both.
Select Section: Not required for this Form-Inputs Option. Attaches the question to a particular section of the survey, thus keeping your survey more organised and tidy.
ID: This characters & numbers field is generated automatically.
Placeholder: A custom message for respondents can be placed inside the input field.
Select Roster Group: Attaches the roster group to a particular section of the survey, thus keeping your survey more organised and tidy..
Help writeup: Gives the user a hint to the answer of the question.
Required: This Password Field should have a record.
Unique: This Text Form should not have repetitive data.
Read only: Non Editable
Disabled: This option should not work.
To SAVE the settings please press Submit Button of Blue Color on bottom right side.
Configuration of Textarea of Inputs Section. Let’s you enter medium to large text. Comes with a customizable feature to adjust the default height (in no. of lines) when the question appears in the form.
Option : Textarea
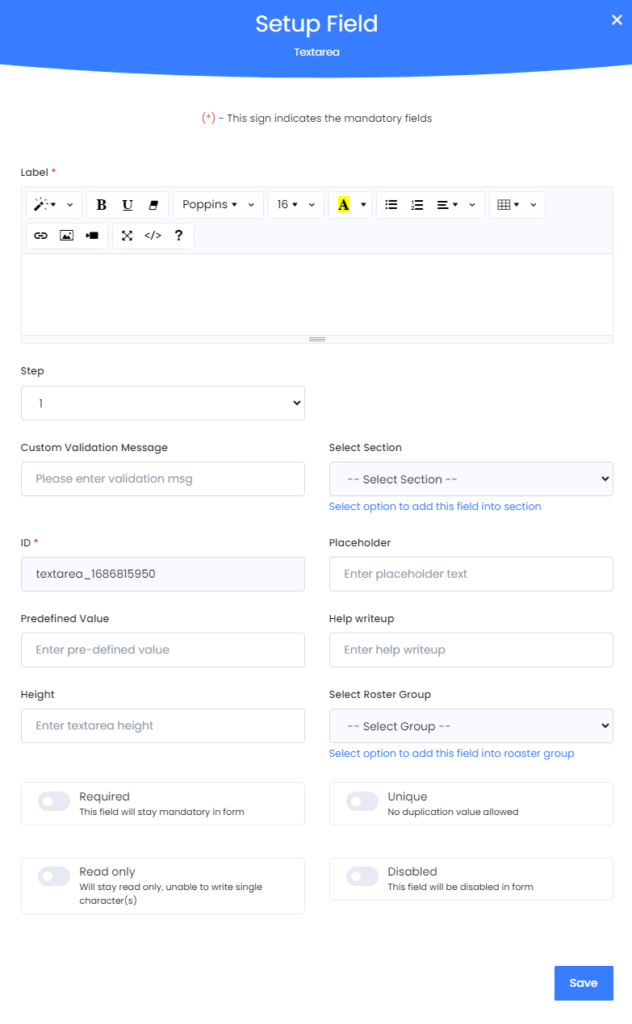
Label : Here you write the Text which you want to display.
Step is number of the Form on Project Dashboard. Refer to this Image below. Check the + Sign.
Mastersurvey Main Screen :

Custom Validation Message:
You have the option to mention please write Characters, Numbers or both.
Select Section: Not required for this Form-Inputs Option. Attaches the question to a particular section of the survey, thus keeping your survey more organised and tidy.
ID: This characters & numbers field is generated automatically.
Placeholder: A custom message for respondents can be placed inside the input field.
Predefined Value: Default Data Entered
Help writeup: Gives the user a hint to the answer of the question.
Height: Enter Textarea Height – There is NO Width
Select Roster Group: Attaches the roster group to a particular section of the survey, thus keeping your survey more organised and tidy..
Required: This Textarea Field should have a record.
Unique: This Text Form should not have repetitive data.
Read only: Non Editable
Disabled: This option should not work.
To SAVE the settings please press Submit Button of Blue Color on bottom right side.